Engage Audiences Overview
Engage Foundations requires a Business tier account and includes Profiles.
See the available plans, or contact us.
Audiences let you group users or accounts based on event behavior and traits that Segment tracks.
You can build Audiences from core tracking events, traits, and computed traits. You can then sync Audiences to hundreds of Destinations or access them with the Profile API.
Building an Audience
You can build an Audience from existing events, traits, computed traits, or other Audiences.
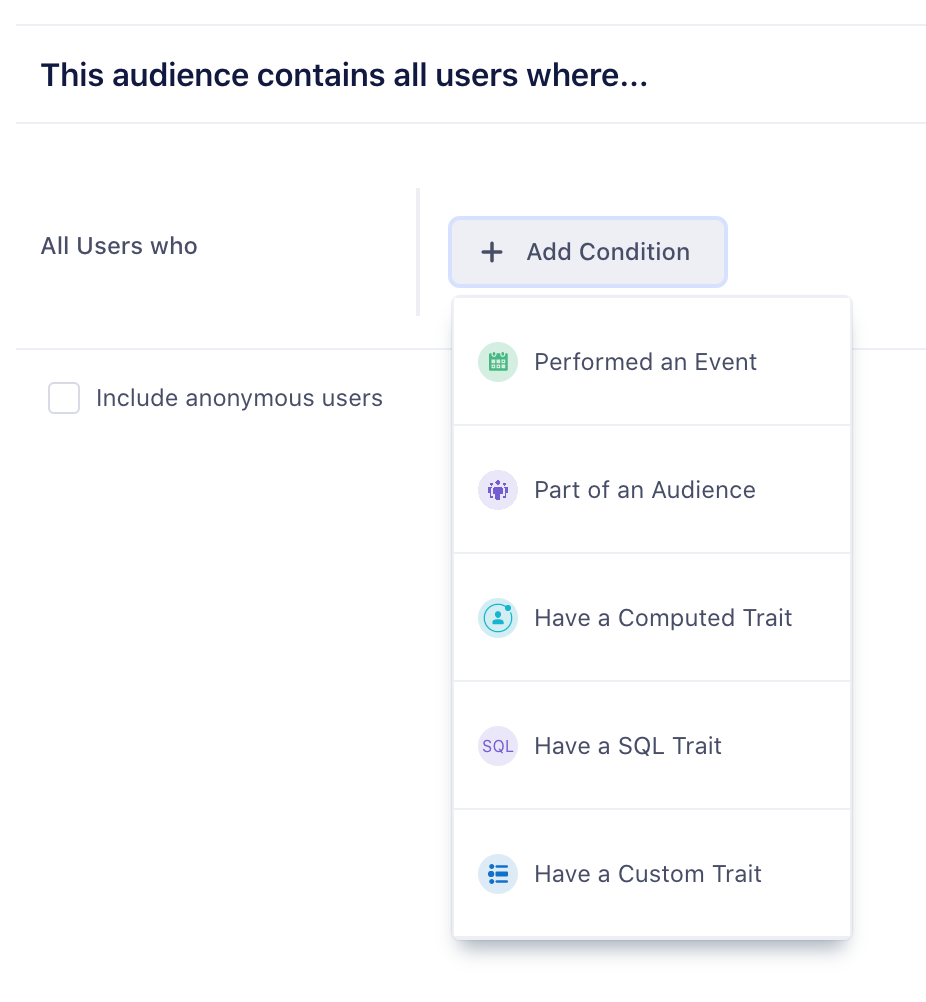
Events
You can build an Audience from any events that are connected to Engage, including Track, Page, and Screen calls. You can use the property button to refine the audience on specific event properties, as well. Select and not who to indicate users that have not performed an event. For example, you might want to look at all users that have viewed a product above a certain price point but not completed the order.
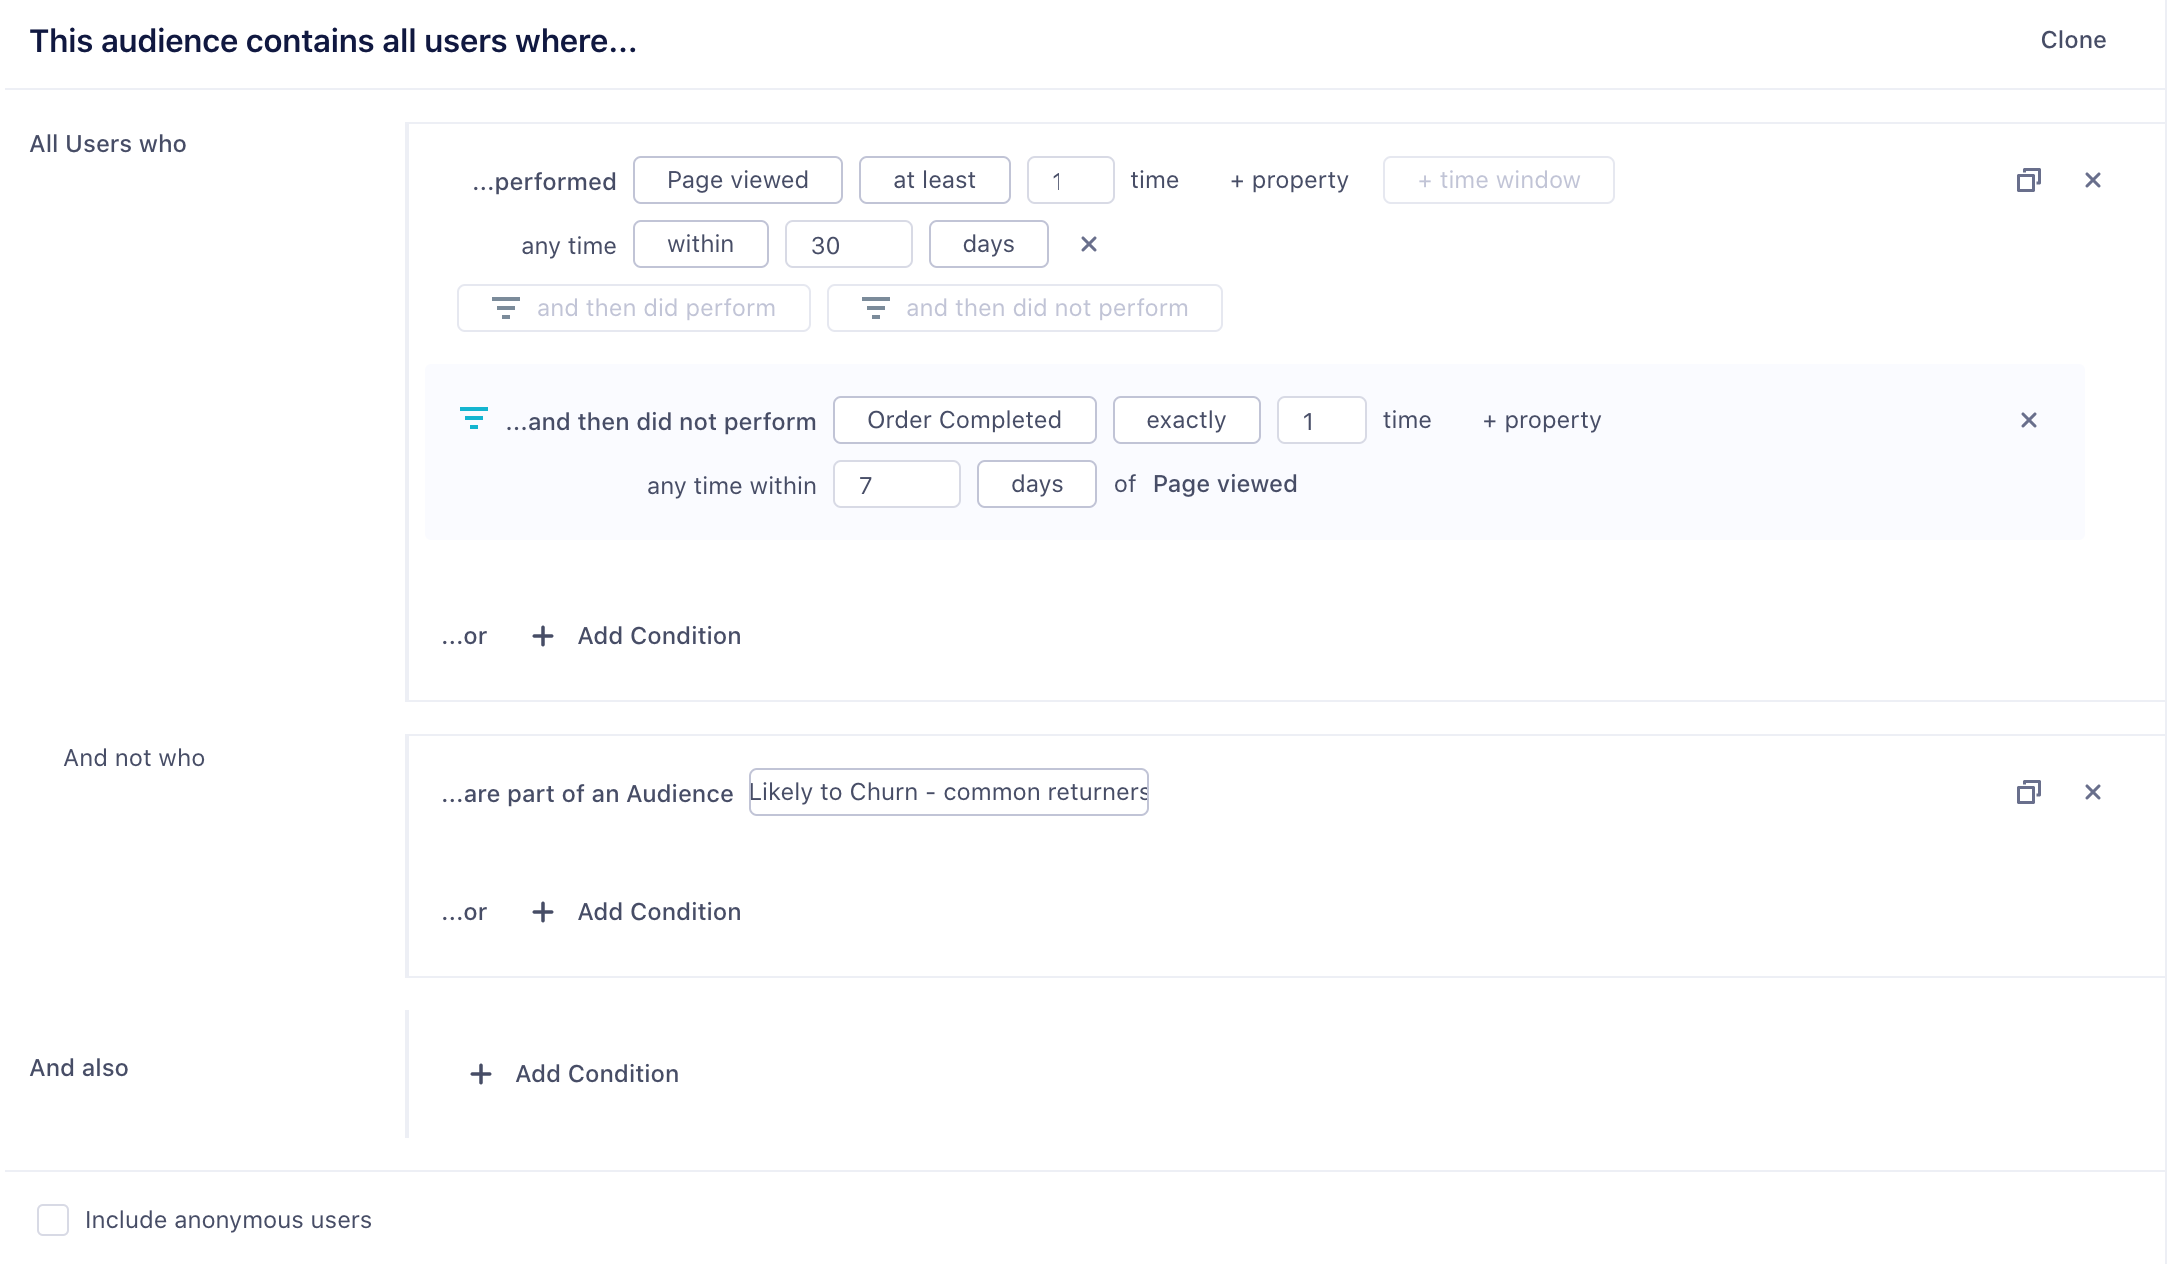
You can also specify two different types of time-windows, within and in between. The within property lets you specify an event that occurred in the last x number of days, while in between lets you specify events that occurred over a rolling time window in the past. A common use case is to look at all customers that were active 30 to 90 days ago, but have not completed an action in the last 30 days.
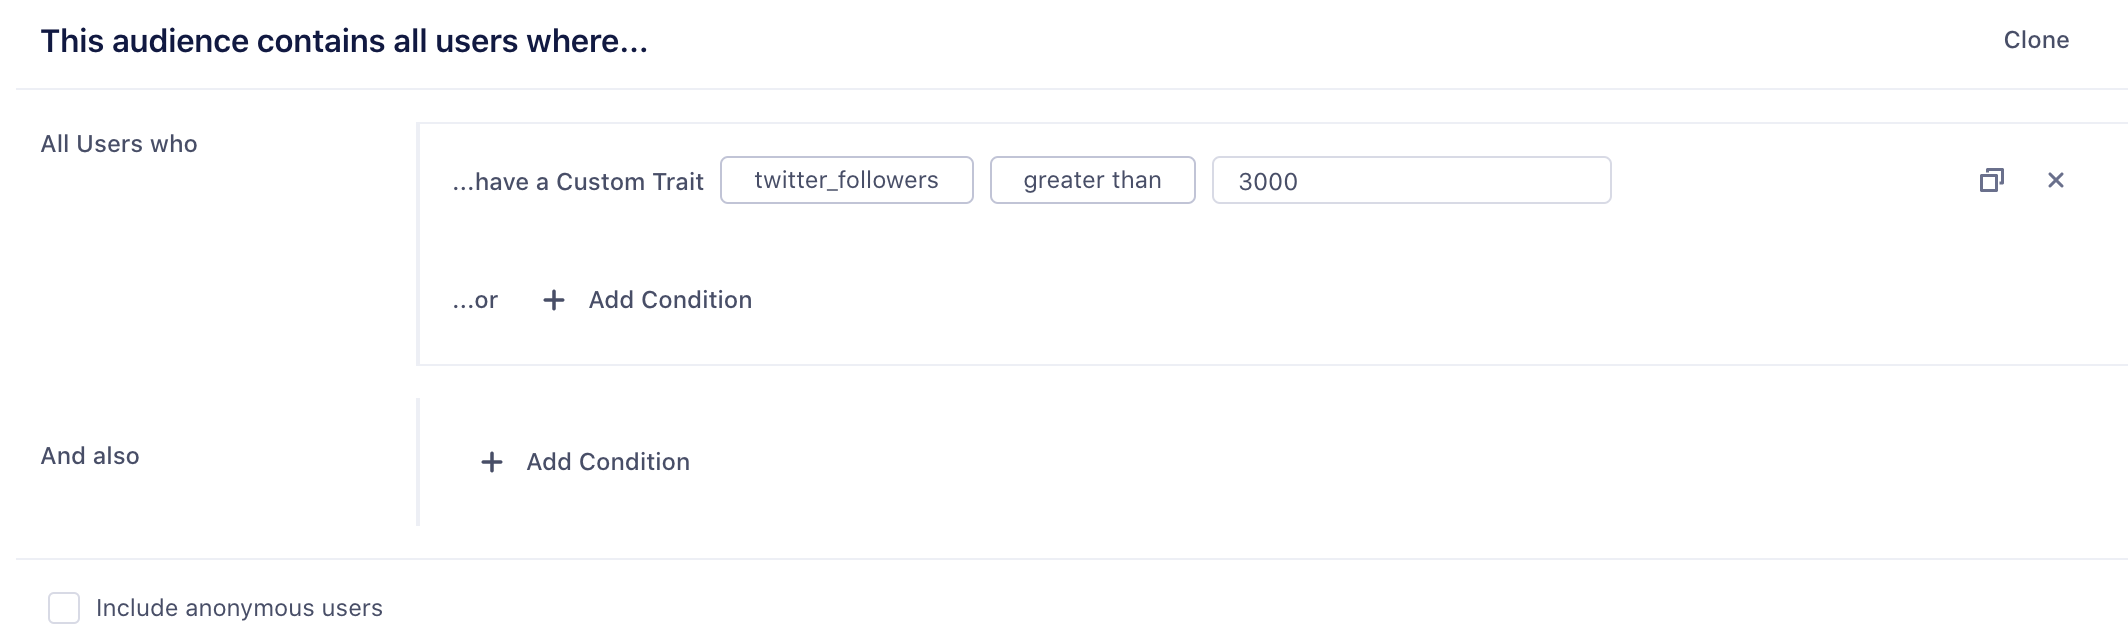
Custom Traits
You can also build Audiences based on custom traits. These traits can be collected from your apps when a user completes a form or signs up using an Identify call. You can view these traits in the user explorer, as well.
Computed Traits
You can also use computed traits in an Audience definition. For example, you can create a total_revenue computed trait and use it to generate an audience of big_spender customers that exceed a certain threshold.
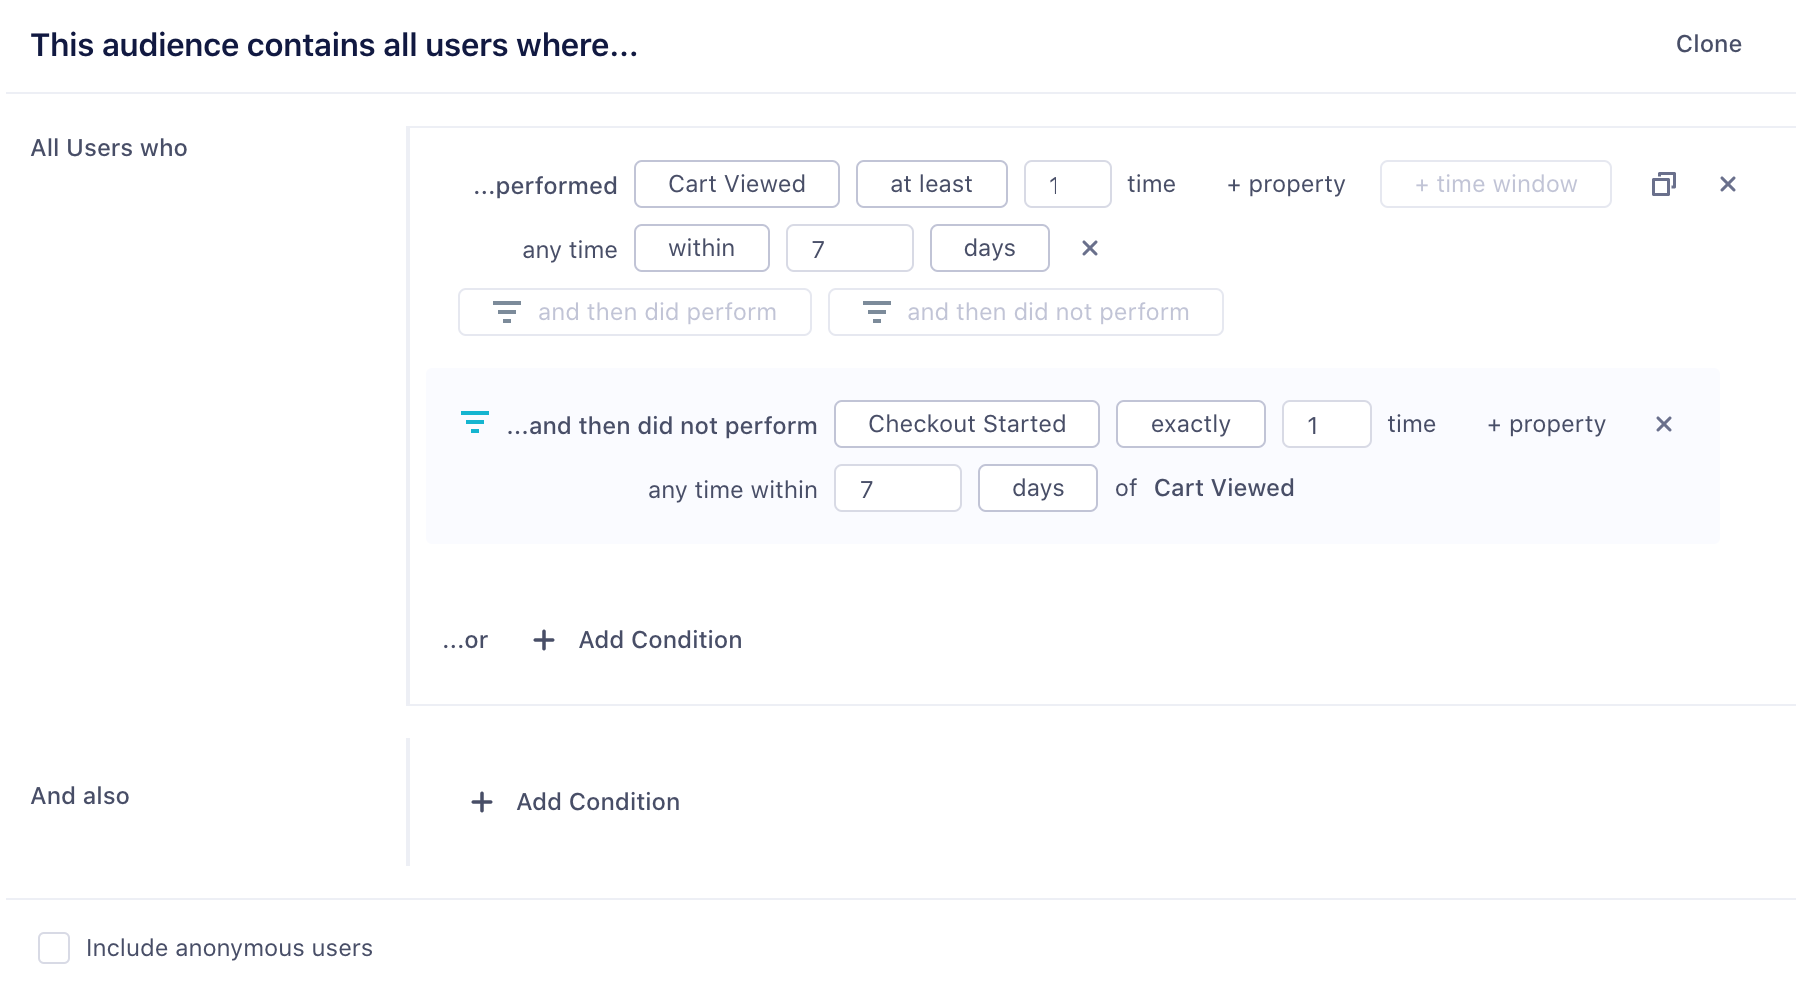
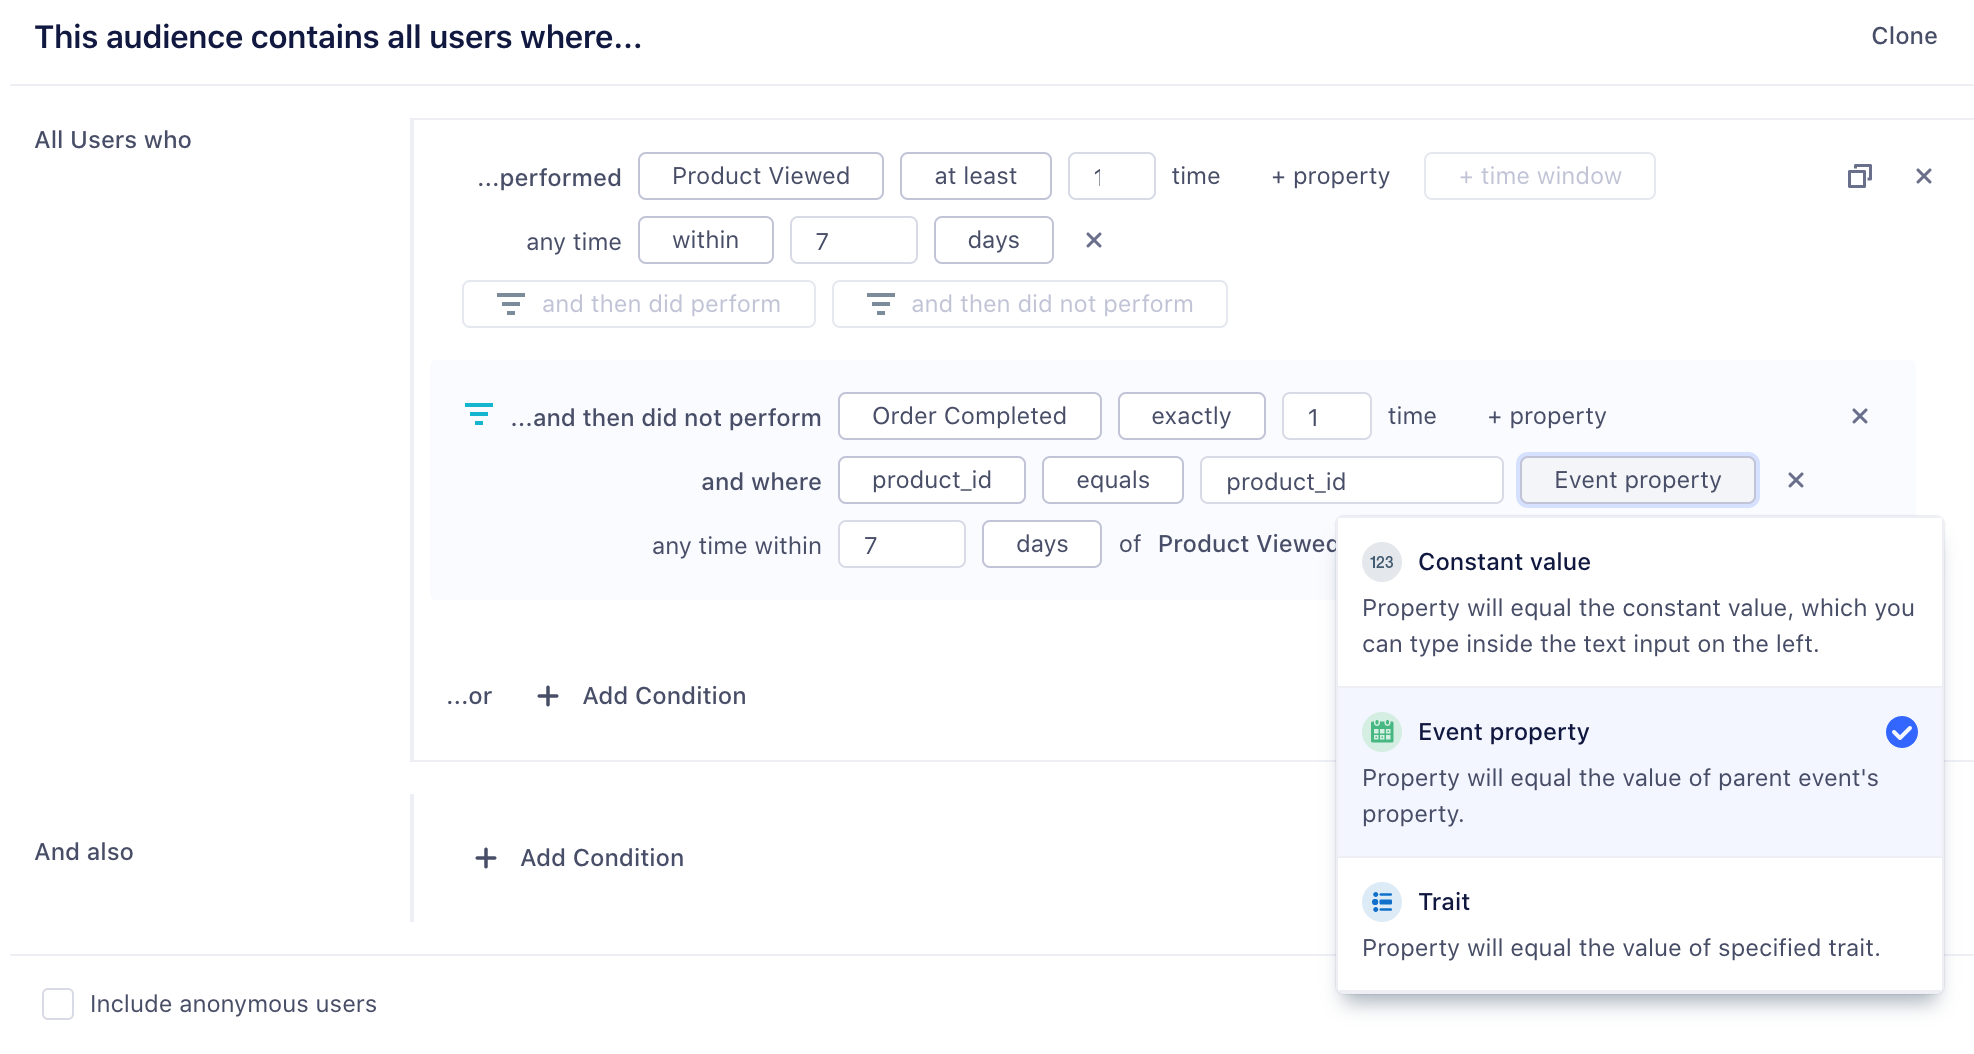
Funnel Audiences
Funnel audiences allow you to specify strict ordering between two events. This might be the case if you want an event to happen or not happen within a specific time window, as in the following example:
Dynamic property references
Dynamic Property references give you more flexibility over funnel audiences. Instead of specifying a constant value in both events, like product_id = 123 for both Product Viewed and Order Completed events, you can specify that a child event references an event property of a parent event. You can also compare an event property to a trait variable.
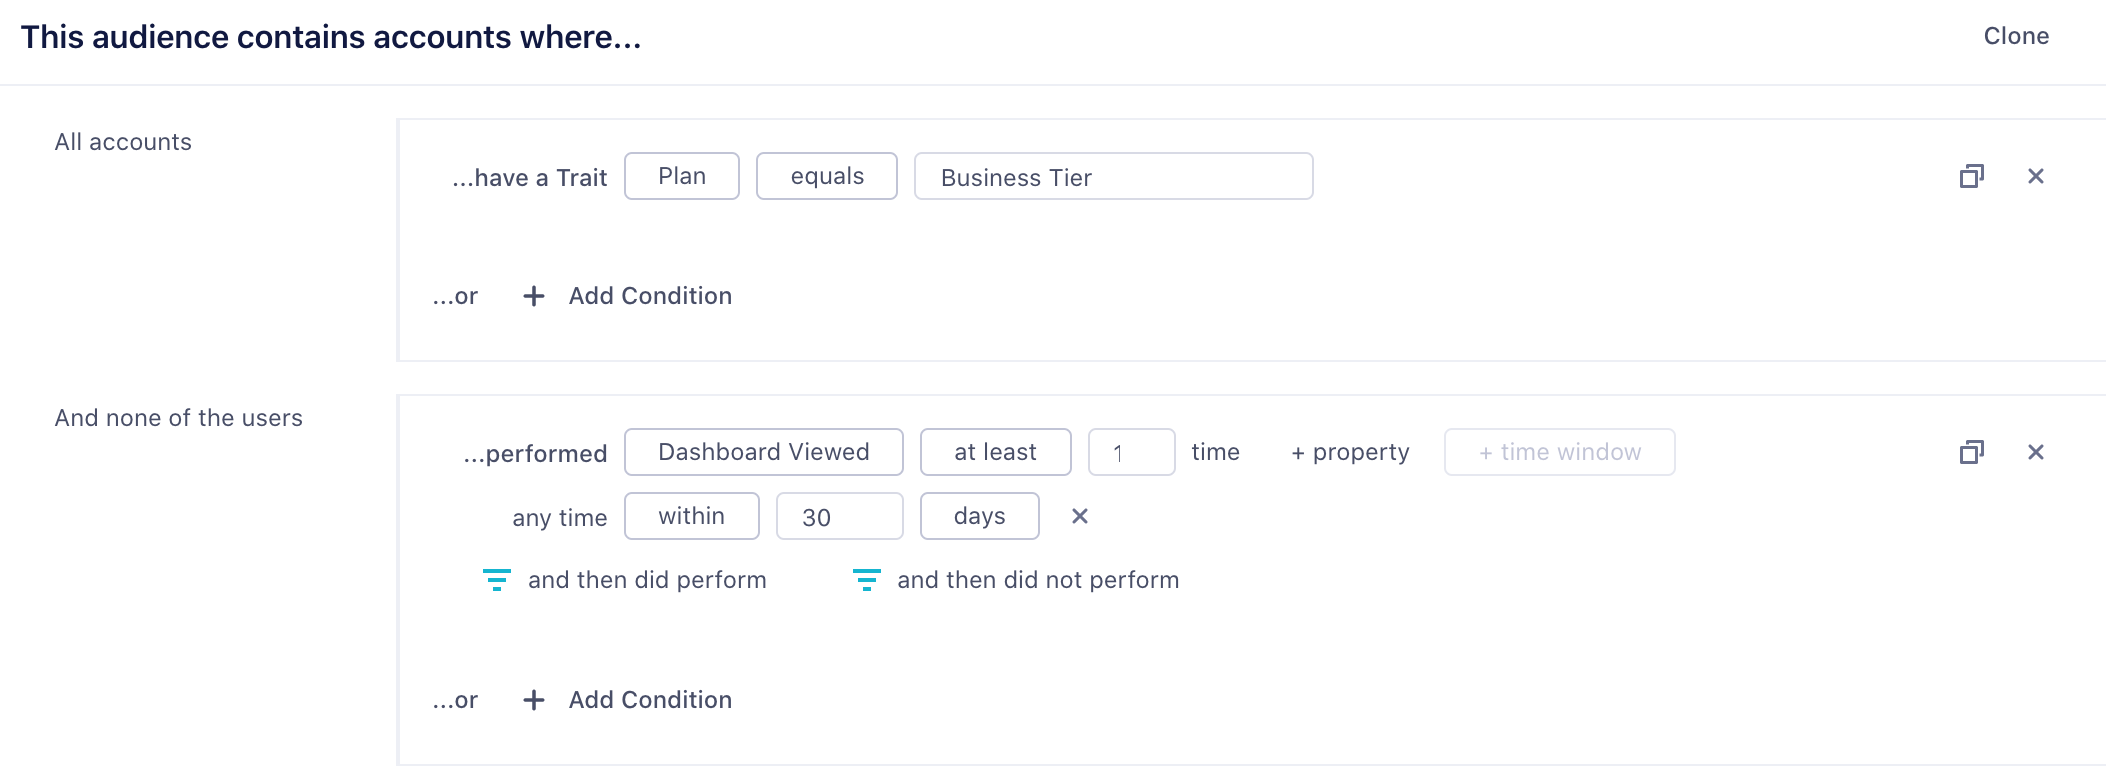
Account-level audiences
If you have a B2B business, you might want to build an Audience of accounts. You can use both account-level traits that you’ve sent through the Group call, or user-level traits and events. For example, you might want to re-engage a list of at-risk accounts defined as companies which are on a business tier plan and where none of the users in that account have logged in recently. When incorporating user-level events or traits, you can specify None of the users, Any users, or All users.
See Account-level Audiences for more information.
Send Audiences to Destinations
With the help of Sources and Destinations in Segment’s catalog, you can create and send Audiences and computed traits to third-party services.
Segment’s Connections pipeline first collects and sends events from your Source to your Destination. Built on top of Connections, Engage then uses the same Source events to let you create Audiences and computed traits within Segment. You can then send the Audience or computed trait you’ve built to your Destination(s).
Because Engage only sends Audiences and computed traits to Destinations, it doesn’t replace a standard event pipeline. Connect a Source directly to a Destination if you want the Destination to receive all events that Segment gathers.
Connect your Audience to a Destination
Audience Keys
Avoid using the same Audience key twice, even if you’ve deleted the original Audience.
Once you’ve previewed your Audience, you can choose to connect it to a Destination or keep the Audience in Segment and export it as a CSV file download.
If you already have Destinations set up in Segment, you can import the configuration from one of your existing sources to Engage. You can only connect one Destination configuration per Destination type.
When you create an Audience, Segment starts syncing your Audience to the Destinations you selected. Audiences are either sent to Destinations as a boolean user-property or a user-list, depending on what the Destination supports. Read more about supported Destinations in the Engage documentation.
For account-level audiences, you can send either a Group call and/or Identify call. Group calls will send one event per account, whereas Identify calls will send an Identify call for each user in the account. This means that even if a user hasn’t performed an event, Segment will still set the account-level computed trait on that user.
Because most marketing tools are still based at the user level, it is often important to map this account-level trait onto each user within an account. See Account-level Audiences for more information.
When you connect a new Destination to an existing Audience, Engage will backfill historical data for that Audience to the new Destination.
Understanding compute times
Because a number of factors (like system load, backfills, or user bases) determine the complexity of an Audience, some compute times take longer than others.
As a result, Segment recommends waiting at least 24 hours for an Audience to finish computing before you resume working with the Audience.
Real-time compute compared to batch
Real-time Compute allows you to update traits and Audiences as Segment receives new events. Real-time Compute unlocks exciting use cases:
- Intra-Session App Personalization: change your app experience with personalized onboarding, product recommendations, and faster funnels based on a user entering and exiting an audience.
- Instant Messaging: Trigger messages in email, live chat, and push notifications instantly, to deliver immediate experiences across channels.
- Operational Workflows: Supercharge your sales and support teams by responding to customer needs faster, based on the latest understanding of a user.
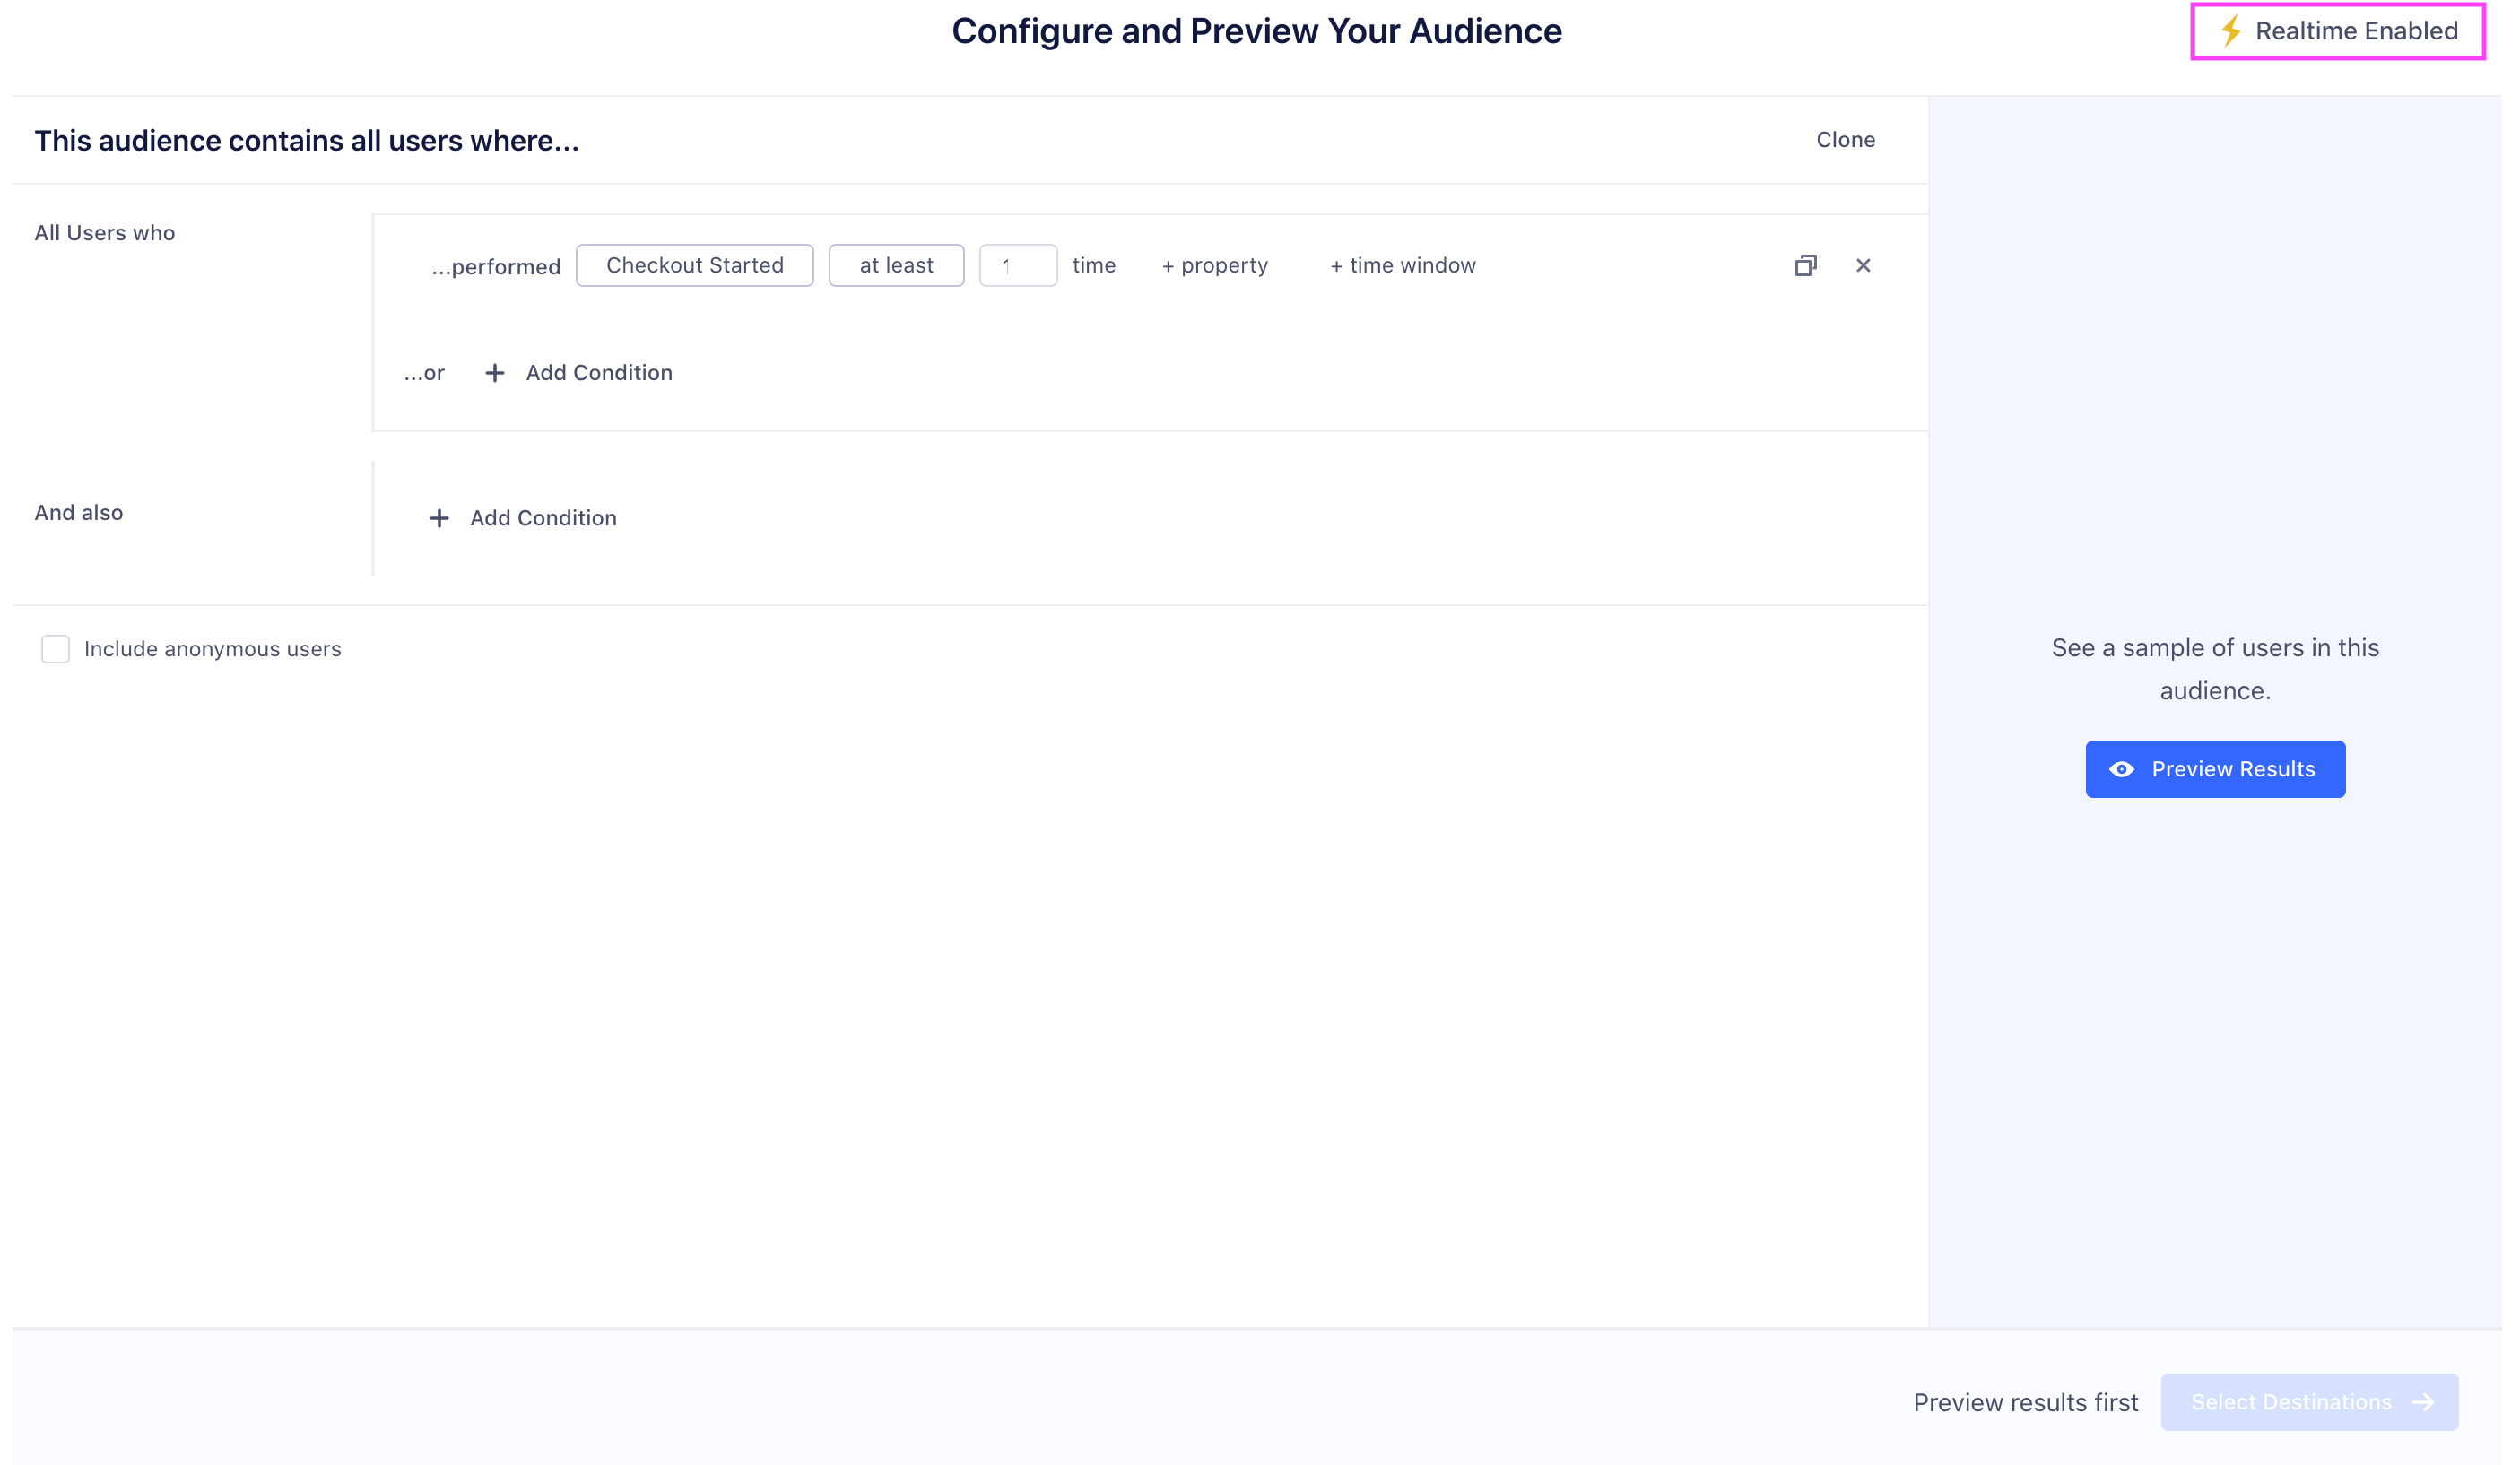
To create a new Audience:
-
Go to your Computed Traits or Audiences tab in Engage and select New.
-
Create your computed trait or Audience.
A lightning bolt indicates that the computation updates in real-time.
-
To preview your Audience, select Select Destinations, then select Review & Create.
By default, Segment queries all historical data to set the current value of the computed trait and Audience. You can uncheck Historical Backfill to compute values for the Audience or trait without using this data. With this disabled, the trait or Audience only uses the data that arrives after you created it.
Facebook Custom Audiences, Marketo Lists, and Adwords Remarking Lists impose rate limits on how quickly Segment can update an Audience. Segment syncs at the highest frequency allowed by the tool, which is between one and six hours.
Editing Realtime Audiences and Traits
Engage supports the editing of realtime Audiences and Traits, which allows you to make nuanced changes to existing Traits and Audiences in situations where cloning or building from scratch may not suit your use case.
To edit a realtime Trait or Audience, follow these steps:
- In your Engage Space, select the Computed Traits or Audiences tab.
- Select the realtime Audience or Trait you want to edit.
- Select the Builder tab and make your edits.
- Select Save Audience to confirm your edits.
Engage then processes your realtime Audience or Trait edits. While the edit task runs, the audience remains locked and you can’t make further changes. Once Engage has finished incorporating your changes, you’ll be able to access your updated Audience or Trait.
If your audience includes historical data (Historical Backfill is enabled), editing an audience creates a new backfill task. The backfill task, and therefore the edit task, take longer to process if the audience is connected to a destination with rate limits. Rate-limited destinations dictate how fast Engage can backfill. View a list of rate-limited destinations.
Access your Audiences using the Profiles API
You can access your Audiences using the Profile API by querying the /traits endpoint. For example, you can query for high_value_user property with the following GET request:
https://profiles.segment.com/v1/spaces/<workspace_id>/collections/users/profiles/email:alex@segment.com/traits?limit=100&include=high_value_user
The query would return the following payload:
    {
        "traits": {
            "high_value_user": true
        },
        "cursor": {
            "url": "",
            "has_more": false,
            "next": "",
            "limit": 100
        }
    }
You can read the full Profile API docs to learn more.
Download your Audience as a CSV file
You can download a copy of your Audience by visiting the the Audience overview page.
 Before you can download the CSV, you will need to generate it. There are three different options for formatting:
- Unformatted: Contains two columns. The first contains the user or account key and the second is a JSON object containing the external IDs. Generating this CSV is faster than the formatted option below. Download example unformatted CSV
- Formatted (with indexed columns for ID types with multiple values): Contains the same first two columns as the unformatted CSV. Additional columns are added for each distinct external ID type. When a given external ID type has more than one value, for example a user with three email addresses, additional columns with indexed headers are added, (
email,email_1,email_2). Download example formatted CSV with indexed columns - Single Column (with one external ID type): Contains only a single column of data with the selected external ID type. When the given external ID type has more than one value, for example a user with two email addresses, additional rows are added. Data in this format is hashed by default with the SHA256 hashing algorithm, but may be downloaded raw (unhashed) with appropriate permissions. This format is useful for uploading the audience to destinations like Snapchat or Braze, which may require a single column of hashed emails, for example. Download example single column hashed CSV
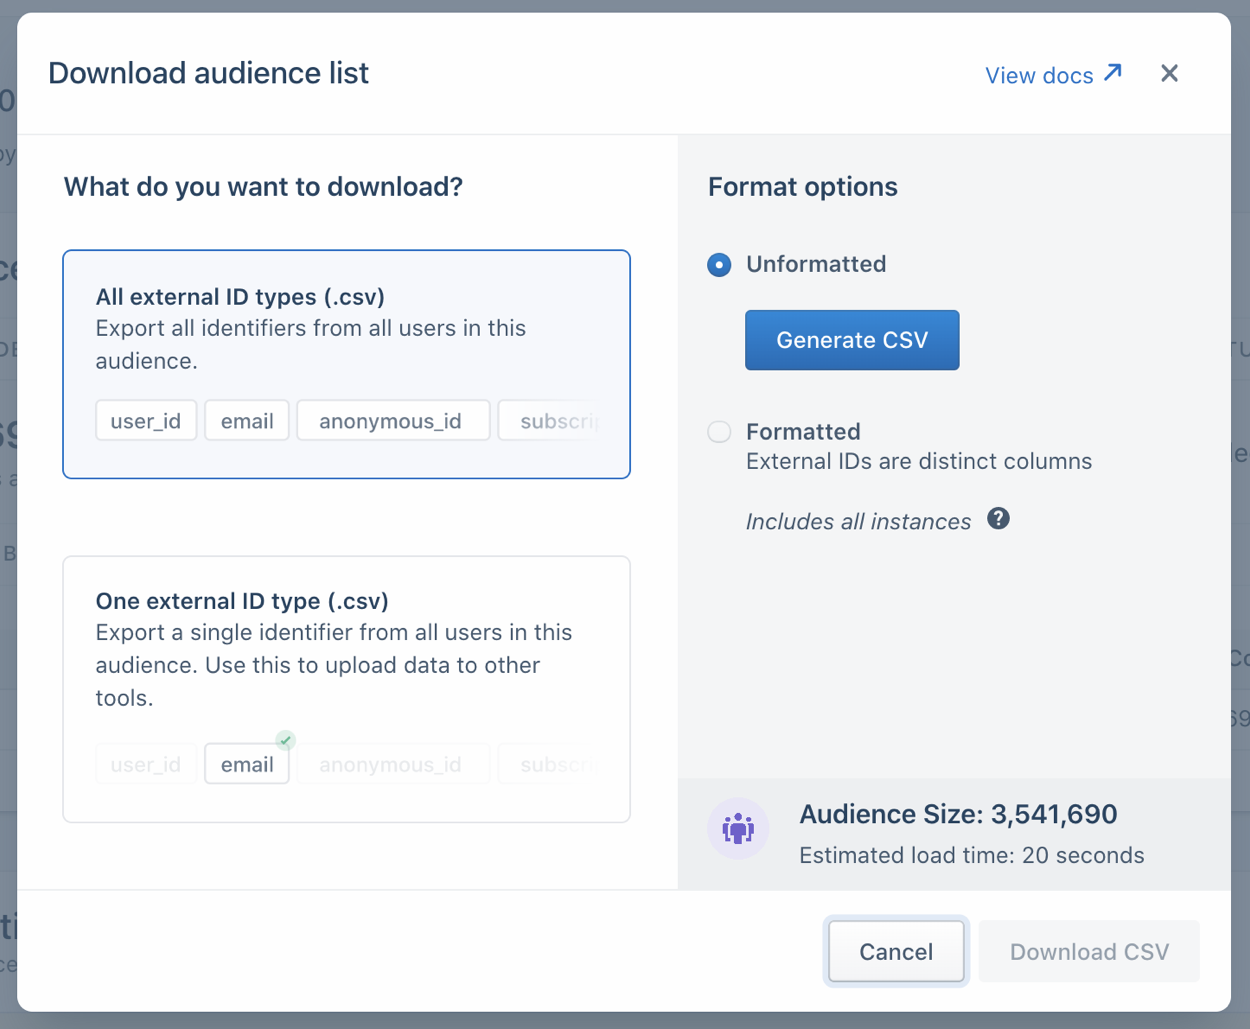 |
Generating a CSV can take a substantial amount of time for large audiences (around 30 seconds for a formatted CSV with 1 million rows). For CSVs that are expected to take over 20 seconds, Segment displays an estimated generation time. After you generate the CSV file, leave the modal window open while Segment creates the file. (If the audience recalculates between when you click Generate and when you download the file, you might want to regenerate the file. The CSV is a snapshot from when you clicked Generate, and could be outdated.) |
This page was last modified: 27 Sep 2022
Need support?
Questions? Problems? Need more info? Contact Segment Support for assistance!